


The marvelous spiral


Any project can be overthought, but at the same time, you reap
what you sow. The spiral is naturally striking and yet amazingly
intuitive and simple.
Enjoy the simplicity and then, as your technique produces more
predictable results, take risks and prepare to be WOWed.


Why are spirals special?
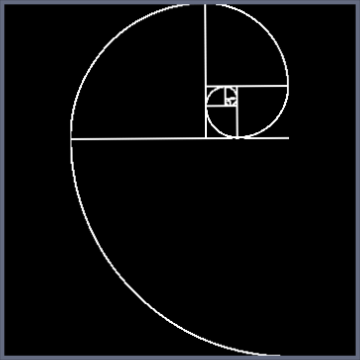
Photographers and other artists often use the golden ratio in their compositions. This has resulted in the occasional
appearance of standard overlays in viewfinders or design software show a golden spiral or Fibonacci Spiral, like the one
on the left. Why? Leonardo da Vinci did it because he believed the ratio to be aesthetically pleasing. It was called the
divine proportion in the Renaissance. Newer science claims the ratio matches the mechanics of our eyes and can simply
be scanned and processed faster so we have collectively assigned an aesthetic quality to that which is “easy.” So?
The simple answer is that for some reason common to most humans, we find it intriguing, or beautiful, or mystic, or
somehow pleasing. Pleasing to the point that there are repeated studies of the spiral form from mathematical, biological
and artistic perspectives and a multitude of defined parameters and comparisons of thes forms in literature and nature.
Jacob Bernoulli studied the logarithmic spiral extensively and named it spira mirabilis, or marvelous spiral. It appears
throughout the universe in galaxies like our own Milky Way, as weather patterns on the planets in our solar system (think
hurricanes), and in the flight patterns of insects approaching a light or a hawk zeroing in on its prey. It is often seen in
oceanic forms at places like Half Moon Bay in California, or the nautilus and whirlpools. It is seen in our fingerprints; the
nerves in our corneas and also in three dimensional shapes like certain broccolis and sunflowers, and don’t forget that
really important double helix - our very DNA. Wow! That’s a lot to think about, and this is supposed to be simple and fun.
I was told there would be no math.
That reminds me, why do people study imaginary numbers if they are imaginary? The fractal form called the Mandelbrot
set is a logarithmic spiral that is formed by equations using imaginary numbers. My head nearly exploded when I learned
that.
Back to the discussion at hand: the bottom line is that throughout history people have been using the golden ratio
described at 1:1.618 in art because it strikes some nerve.
I’m mentioning all of this for a reason. Some people like spiral tie dyes because they are cool. That’s a perfect reason.
Then again, people have been using spiral forms like the Cretan Labyrinth for religious and meditative practice for 4,000
years and you can see at least one of them from space in the Nazca lines, so if you want to take that extra step and
consciously tap in to a universal creative power, take a moment to set the intention and allow that to flow through your art.
A spiral is easy to fold and the results lend immediate insight into how the art of tie dye works and makes a perfect
foundation for exploration of the art. Let’s do it!


The Marvelous Spiral

Lay the shirt on a clean flat surface. The linoleum in the kitchen works great. If that’s not an option, your Formica or glass
table top is an excellent surface. Cardboard also works, but is a little stickier. I strongly recommend avoiding wood
surfaces, as the Soda Ash may lift some to the stain and ruin your material or the wood surface.
Spread the shirt flat, as if it was on a hanger, and smooth any wrinkles.
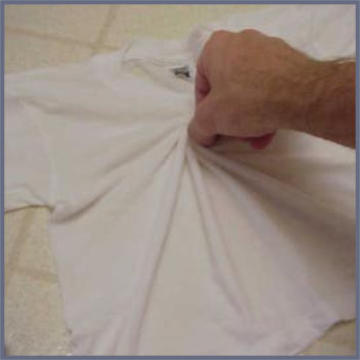
Pinch a spot near the center of the shirt, and holding tight, begin to twist. Do not lift the pinched spot off the floor. I find a
little pinch to be my standard, but sometimes a big pinch, creating wider bands, is preferable. I have seen other
techniques that use a dowel to press down to hold the center, or you can try folding a couple short pleats in the middle for
a little different effect. For the first time, start with a pinch. You don’t need to find the exact center of the shirt, just the
center of your spiral. I am prone to find a place that would be over the heart, but you may find you like some other place.


Getting Centered

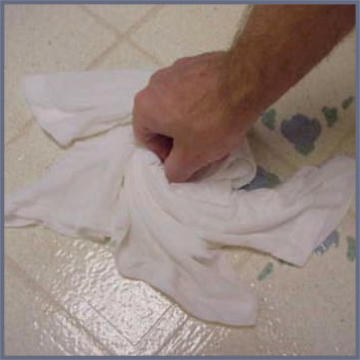
I grab hold and scoot around the shirt in a circle so that I can maintain a steady grip. As you twist, you will notice folds, or
pleats, are forming. Try, with your other hand, to keep the pleats a uniform size. Here we are, back at the math. This is a
logarithmic spiral, so we expect them to get larger with each additional layer, so uniform doesn’t necessarily mean exactly
the same, but when they start to get bigger try to keep the getting bigger a uniform rate.
The tops and bottoms of these pleats will become your dyeing surface. It is normal for the outermost pleats to be a little
larger than the ones in the middle, but if there is a substantial change in size, work them out or start again. One way to work
them out is to create new pleats in the middle of the pleats that are too tall. Why would I say some pleats might be too tall?
When we apply the dye, the tall pleats tend to fall over the shorter ones and that keeps the dye from penetrating uniformly.
This can result in big patches of negative space that break the patterns

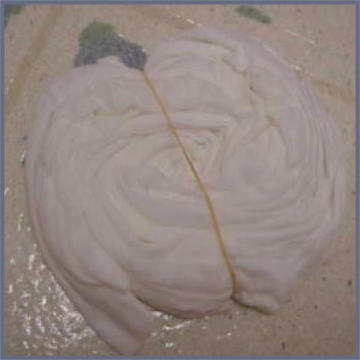
Doing the Twist

When you are done, the shirt should be twisted into a circle about eight inches in diameter and two inches tall and the pleats
will look something like a cinnamon roll. The top side of your roll will have big puffy pleats, so spend a moment and smooth
them out and review where you might have difficulty getting dye on each one. Pull a rubber band or two around the roll to
hold things in place. I usually try to put a rubber band over the sleeves to hold them in place.
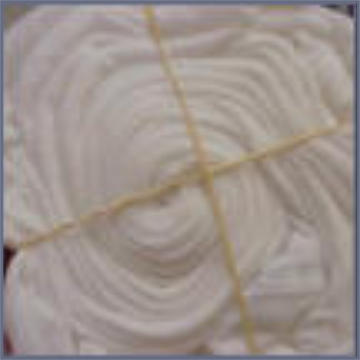
There are many methods of binding. I use rubber bands, rather than string or cord, because they are easier. Stretch a rubber
band between your thumbs and index fingers to form a long, thin rectangle. Keep your hands wider than the shirt and
carefully slide the bottom of your rubber-band-rectangle under the shirt to the middle. When you release the rubber band, it
should bisect your circle like the equator on a two dimensional representation of Earth. Repeat this process, changing the
direction for each rubber band until you have three to six rubber bands in place. At the completion of this step, the rubber
bands should be aligned so they bisect the shirt like the lines on a freshly sliced pie. The shirt will have a tendency to fold in
on itself. Try to keep it flat. If your rubber bands are too tight, they will bunch up the pleats, making it difficult to apply the dye
uniformly. You might try larger or smaller bands until there is a good fit/match. The purpose of these rubber bands is not to
tightly bind the shirt to create resistance like in some patterns, but only to keep the spiral form from falling apart while you
work on it.
The bottom of your roll, when you turn it over, will have much tighter and neater pleats. This is the area that will allow more
detail in your work. The contrast of the dye penetration on the two sides is the places where spontaneous art happens. You
can try to perfect the top to mimic the bottom, but too much effort on that front can lead to frustration as you begin to have
diminishing returns on your efforts fairly quickly

Cinnamon Rolls

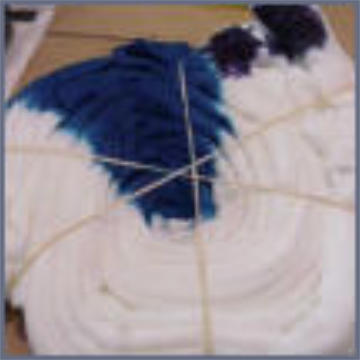
Apply the dye with sponge brushes, using the rubber bands like the lines in a coloring book. Put one color in each "slice."
These different colors will be different arms of the spiral. More color slices create more arms. Try to plan the color
placement so that complimentary colors do not touch. Purple and yellow, when they touch, will make brown, where blue and
yellow will make green. Start with the lighter colors. When yellow is applied first, and blue is applied next to it, the edge that
touches will become a brilliant green. If the blue is applied first, the yellow will have a diminished effect, leaving a greenish
blue
The bottom of your roll, when you turn it over, will have much tighter and neater pleats. This is the area that will allow more
detail in your work. The contrast of the dye penetration on the two sides is the places where spontaneous art happens.
You can try to perfect the top to mimic the bottom, but too much effort on that front can lead to frustration as you beging to
have deminishing returns on your efforts fairly quickly.
Apply enough dye to cover every pleat, but do not saturate the shirt. The dye will continue to penetrate the material for
several hours, so apply only enough dye to cover the top quarter to 3/8ths of the pleat. Too much dye will bleed and run,
causing streaks and muddy spots in the final pattern. I use toothpicks to separate the pleats one at a time to verify that I
did not miss any of the shorter pleats. When the first side is done, flip the shirt over and repeat the dyeing process, trying to
match the colors from the other side.

Dye

Put the finished product on newspaper to absorb any extra dye. After a minute or two, lift the shirt off the newspaper and
place it in a plastic bag. Seal the bag and let it sit on a warm window sill for twelve hours or more on the first try -- twenty-
four hours is really my recommendation. The colors become more brilliant as they set, so be patient. When the colors are
set, it is time to rinse the excess dye away.
The rinsing process is certainly the best part of tie-dye creation. This is the moment you get to see what you have created.
Pay close attention to the pattern as it slowly shows itself. This is when you learn exactly which folds created patterns you
like and dislike.
No one ever taught me to rinse, so this is my method. If anyone knows a better method, please let me know.
Place the shirt under a heavy stream of cold water for the initial rinse. Leave your bindings in place. Start at the light colors
and completely saturate the shirt as quickly as possible. The water dilutes the excess dye, so the colors are less likely to
bleed together. Dharma recommends warm water, so after the initial rinsing/saturation, I use warm water. Remove the rubber
bands and rinse thoroughly. Continue to rinse, wringing and squishing occasionally, until very little color comes from the shirt
and then wash the shirt with a detergent free of chlorine or bleach, preferably a professional textile detergent like Synthrapol.
Wash in hot water, then dry on medium heat. Wash the shirt separately at least one more time to keep it from inadvertently
staining other clothes.
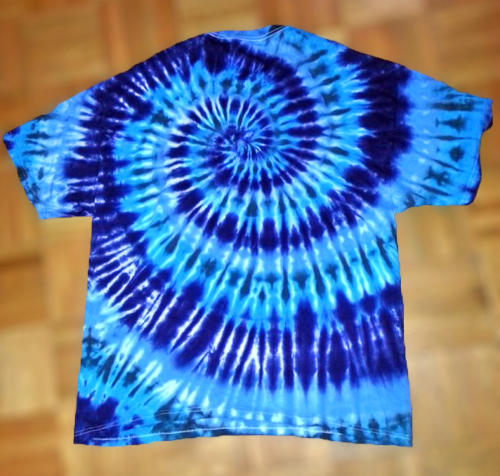
You have now completed your first Tie-Dye and I am sure it looks great!
Finishing Up