OH WOW! You’ve reached a really old page. Why don’t you go to the new site?

How to Tie-Dye--The Short Version
Revised 06-21-01
Copyright 1998-2001 by Jeremy
Wanamaker
Please feel free to use share this information, so long as my name remains
attached.
Thank
You!
Basic Background
I have created hundreds
(maybe thousands! heck, I've done 40 in the last two weeks) of high quality,
tie-dyed shirts (and other things) in the past sixteen years. Not only do I
sincerely enjoy this versatile, main stream art form, but I also love creating
clothing at a mere fraction of the cost of the designer labels. Most people, when
they think of tie-dye, picture a hippie in the back yard dipping wads of
material into vats of simmering colors. I work in the kitchen over my sink with
a dozen or more plastic jars of dye and a pile of sponge brushes. I generally
wear kitchen cleaning gloves and cover the counter areas with newspaper or
cardboard boxes. This helps speed the cleaning process.
How it all Works
Tie-dye is an art based on
resistance. By this I mean that beautiful tie-dyes can be created with
only one color, because the intent is to create a pattern of the places that
resist the dye. Resistance is obtained by binding. It's
effect cannot be duplicated but it can be mimicked with careful dye
application.
Materials
The first step in making a
great tie-dye is understanding the materials.
Naturally, better materials reap better results. Synthetic shirts, like
polyester and rayon, will not take the dyes I use. Cotton, wool and silk are
all acceptable, but cotton is preferred. T-shirts can be purchased just about
anywhere. I buy a package of three Fruit of the Loom, extra
large, crew neck T-shirts at Target, for about 6 dollars, or even
better, I order from Dharma Trading Co:
![]()
A quick note here: I am in no way associated with Dharma with this one exception: I use their products because they work, the sales staff is friendly and knowledgeable, and they deliver when they say they will -- that is my experience.
There are a variety of dye types and brands. Ritt and Deka are readily available at art supply shops and grocery stores, but they are more difficult to use (as they should be hot) and produce poor results when compared to textile dyes. I will say however, that these "over the counter" dies are easy to mix and, though not as vivid, will last a looong time. Procion® MX Fiber Reactive dyes are used by most professionals and are cheap, easy and long lasting. They are available, usually by mail order, in a vast array of colors. Dharma Trading Co., in San Rafael, California, is my favorite supplier. They have everything you need, from the soda ash pre-soak to all cotton clothing, at very good prices. Free catalogs can be obtained by calling 1-800-542-5227. If you know how to mix colors, red, blue, yellow and black will get you started at a cost of less than $20 plus shipping. This will be enough dye to make at least 25 shirts.
PreTreating
Textile
dyes work by creating a chemical bond with the material. This takes time
but can be hastened by raising the Ph.
This is most easily achieved by soaking the shirt in solution of sodium
carbonate. Sodium carbonate is called soda ash and costs less than two dollars
for a pound. Mix about a cup of soda ash in one gallon of warm water. Put the
shirts in this mixture and let them soak for ten or fifteen minutes. This is
when I mix the dyes.
Mixing Dyes
The best advice I can
give on mixing dye is to follow the instructions included with the dye. Every
manufacturer has a different technique for what they consider optimum. Dye
comes as a very fine powder to which you add water. Long term exposure to these
minute particles can lead to respiratory allergies (or cancer). You should
always wear a dust mask over your face and work in a well-ventilated area while
mixing. When you are familiar with the results of a particular mix, experiment
with different concentrations; more dye produces deeper hues and less dye makes
lighter shades.
Let's Get On With It
When mixing
is complete, put on rubber gloves. I used to wear latex surgical gloves, but
now I use the yellow ones from the grocery store or even better, vinyl surgical
type gloves from Sam's Club. The vinyl gloves are better than the big yellow
gloves because you get the same tactile sense as with the latex and better than
the latex because they seem to hold up better in the soda ash. Also, they rinse
clean very easily. My fingernails have broken latex and exposure to soda
ash, soap, etc. breaks them down after a while and makes them feel
sticky. Soda ash is mildly alkaline. It opens the pores of the cotton to
better receive the pigment and, with possible irritation to your skin, will do
the same to your hands. Wring the shirts completely. Do not rinse out the
pre-soak.
Patterns
and designs are controlled by dye placement and the method of tying. A simple,
yet exciting form is the spiral. It is easy to fold and the results lend
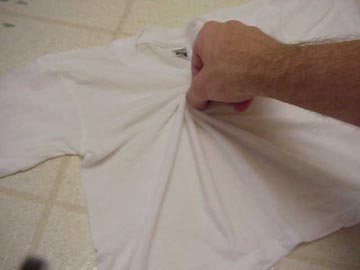
immediate insight into how the art of tie dye works. Lay the shirt on a clean
flat surface. The linoleum in the kitchen works great. Spread the shirt flat,
as if it was on a hanger, and smooth any wrinkles.
 Click
on the pictures for larger images
Click
on the pictures for larger images
Pinch a spot near the center of the shirt, and holding tight, begin to twist. Do not lift the pinched spot off the floor.
I grab hold and scoot around the shirt in a circle so that I can maintain a steady grip. As you twist, you will notice folds, or pleats, are forming. Try, with your other hand, to keep the pleats a uniform size.
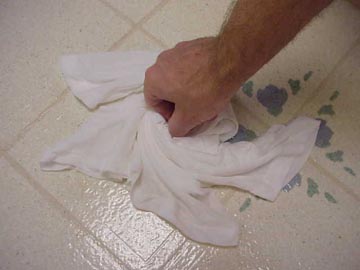
The tops and bottoms of these pleats will become your dyeing surface. It is normal for the outermost pleats to be a little larger than the ones in the middle, but if there is a substantial change in size, start again. When you are done, the shirt should be twisted into a circle about eight inches in diameter and two inches tall and the pleats will look something like a cinnamon roll.

There are
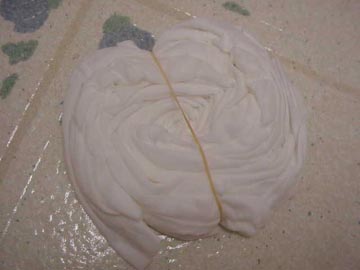
many methods of binding. I use rubber bands, rather than string or cord,
because they are easier. Stretch a rubber band between your thumbs and index
fingers to form a long, thin rectangle. Keep your hands wider than the shirt
and carefully slide the bottom of your rubber-band-rectangle under the shirt to
the middle. When you release the rubber
band, it should bisect your circle like the equator on a two dimensional
representation of Earth. Repeat this process, changing the direction for each
rubber band until you have three to six rubber bands in place. At the
completion of this step, the rubber bands should be aligned so they bisect the
shirt like the lines on a freshly sliced pie. The shirt will have a tendency to
fold in on itself. Try to keep it flat. If your rubber bands are too tight,
they will bunch up the pleats, making it difficult to apply the dye uniformly.
You might try larger or smaller bands until there is a good fit/match.
The purpose of these rubber bands is not to tightly bind the shirt to create
resistance like in some patterns, but only to keep the spiral form from falling
apart while you work on it.
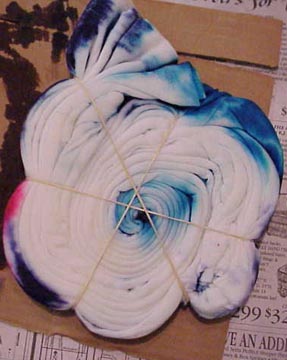
Apply the
dye with sponge brushes, using the rubber bands like the lines in a coloring
book. Put one color in each "slice."

These different colors will be different arms
of the spiral. More color slices create more arms. Try to plan the color
placement so that complimentary colors do not touch. Purple and yellow, when
they touch, will make brown, where blue and yellow will make green. Start with
the lighter colors. When yellow is applied first, and blue is applied next to
it, the edge that touches will become a brilliant green. If the blue is applied
first, the yellow will have a diminished effect, leaving a greenish blue.
Apply enough dye to cover
every pleat, but do not saturate the shirt. The dye will
continue to penetrate the material for several
hours, so apply only enough dye to cover the
top quarter to 3/8ths of the pleat. Too much dye
will bleed and run, causing streaks and muddy spots in the final pattern. I use toothpicks to separate the
pleats one at a time to verify that I did not miss any of the shorter pleats.
When the first side is done, flip the shirt over and repeat the dyeing process,
trying to match the colors from the other side.
Put the
finished product on newspaper to absorb any extra dye. After a minute or two,
lift the shirt off the newspaper and place it in a plastic bag. Seal the bag
and let it sit on a warm window sill for twelve hours or more on the first try
-- twenty-four hours is really my recommendation. The colors become more
brilliant as they set, so be patient. When the colors are set, it is time to
rinse the excess dye away.
All Done
except the Finishing Up
The rinsing
process is certainly the best part of tie-dye creation. This is the moment you
get to see what you have created. Pay close attention to the pattern as it
slowly shows itself. This is when you learn exactly which folds created
patterns you like and dislike.
No one ever
taught me to rinse, so this is my method. If anyone knows a better method,
please let me know.
Place the shirt under a heavy stream of cold water for the initial rinse. Start at the light colors and completely saturate the shirt as quickly as possible. The water dilutes the excess dye, so the colors are less likely to bleed together. Dharma recommends hot water, so after the initial rinsing/saturation, I use hot water. Remove the rubber bands and rinse thoroughly. Continue to rinse, wringing and squishing occasionally, until very little color comes from the shirt and then wash the shirt with a detergent free of chlorine or bleach. Wash in hot water, then dry on medium heat. Wash the shirt separately at least one more time to keep it from inadvertently staining other clothes.
You have now completed your first Tie-Dye and I am sure it looks great! The next one is almost always better than the last, and I say this after sixteen years.